
What was obvious about the chicken at the reception was that it had not been cooked the way chicken is usually cooked -- baked in a hot, dry oven to an internal temperature of at least 160 degrees Fahrenheit (the temperature recommended by the 1999 USDA Food Safety and Inspection Service rules for the cooking of uncured poultry.) A chicken breast cooked to 160 degrees is safe to eat; at that temperature it will be pasteurized in something under fifteen seconds. But it will also have the dry, tough and rather chewy texture that explains why a half bucket of leftover fried chicken will consist mostly of breasts that were ignored while people dug for the juicy, less-temperature-sensitive legs and thighs.
I am a fairly good cook. When the wife mentions that she has enjoyed a dish we have while we are out and about my first thought is to try to figure out how to make it at home. The caterer's inexplicably-tender chicken breast required a bit of research. After many long hours of flogging Google's search engine I think I know: a) how the caterer cooked the chickens they served, and b) a method available to a home cook to achieve something similar although it would be difficult to create an exact duplicate without expensive, commercial-grade equipment.
What a) and b) above have in common is that they rely on more recent standards released by the USDA that provide guidelines for pasteurizing meat and poultry at lower internal temperatures by holding that temperature for a longer time. The same germ-killing goodness that is achieved by holding the internal temperature of a chicken breast at 160 degrees for 15 seconds can be achieved by holding it at 155 degrees for 45 seconds or at 150 degrees for three minutes or at 140 degrees for half an hour. Please note that this is the internal temperature -- the temperature of that coolest spot right in the middle of the meat -- not the temperature of the oven or the surface of the skin. For a chicken breast to be safe to eat when you cook it to an internal temperature of 140 degrees that coolest spot in the center has to be at least 140 degrees for at least half an hour.
As for item a) -- how the caterer probably cooked the chicken (and the tenderloin) served at the reception -- my guess is that it involved a commercial steam/electric/convection combination oven (something like this one, for instance). As to whether this sort of thing is also available to the home cook, and thus is a candidate for the answer to item b), it would depend on your budget, and on the size of your kitchen and how much highfaluting plumbing and wiring you are willing to install. For most home kitchens I expect the $20,000 price tag would be a problem. But if you have the dough, and if you have a really big, industrial-style kitchen, and if the idea of cooking ten nearly-perfect roasted chickens at the same time appeals to you, then by all means get yourself a steam/electric combo oven and stop reading now.
...
Still here? I thought so.
The other way to cook a chicken breast similar to the one served at the reception is to cook it in a controlled-temperature water (or oil) bath at, say, 138 degrees Fahrenheit until it is thoroughly cooked through, and then pop it is a hot pan (or under a broiler) for a few seconds to brown the skin. To keep it from getting too waterlogged during the extended cooking session you probably want to put the chicken in a vacuum-sealed plastic package to protect it from the water. This cooking process (which you will have seen if you watch the show "Iron Chef" on TV) is called Sous Vide (say it "soo VEEd") from the French term which, I am told, means "under vacuum."
<Mister-Wizard-segment>
To understand the necessity for the water bath, imagine yourself setting your oven to 140 degrees, putting in your raw chicken and climbing in with it yourself. Ok... there are a couple of problems with my thought experiment. First, your oven can't be set that cool, and second, you won't fit. So let's try again. Imagine setting your sauna to a rather-cool 140 degrees and taking in the raw chicken with you. That's easier.
Assuming that you have given the temperature time to equalize before you climb in with your dead avian friend, everything in the sauna will be at 140 degrees -- the rocks on the heater, the air, the cedar bench -- all 140 degrees, assuming that nothing is wet (we'll get to that later). When you plop you flabby thighs on the cedar bench a thermal tug-of-war ensues. The 140 degree cedar will give up heat trying to get your skin up to its temperature, and your skin will pull heat out of the cedar which will cool it down. At the point of contact a compromise temperature will quickly be reached. Since the lightweight cedar has a low specific heat (it can't hold much heat energy,) and since your skin has a much higher specific heat, the resulting temperature at the interface will be much closer to skin temperature than to cedar temperature. And, since cedar is a poor conductor of heat the temperature will tend to stay fairly cool and the hot bench won't burn you butt (or cook your chicken, for that matter.)
Of course, while the cedar is a good thermal insulator it isn't perfect. Heat will continue to flow from the rest of the bench to the part touching your thigh, and on into your skin, and through the layer of flab to your gluteus maximus, and from there it proceeds into your bloodstream and all over your body. You will gradually get hot. That's why you get into a sauna. But you won't really cook because when your skin temperature goes up you will begin to sweat and the evaporation will cool the parts of you exposed to the air. (The part sitting on the cedar bench will stay hot and start to make an ass-shaped puddle.)
Your chicken, being dead, can't sweat, so it will heat up faster. (Do birds sweat, actually, by the way? I'm not sure. Dogs don't -- except for a little bit on their feet -- they keep cool by panting and drooling. I dunno how birds keep cool.) But chicken meat is wet and there will be considerable heat lost to evaporation. Also, neither air nor cedar is a good conductor of heat and, even without the loss to evaporation, it would take a long time for the chicken to get to the internal temperature where bacterial growth stops -- a bit over 130 degrees -- given that the temperature of the sauna is not that much hotter. Clearly we need a way to bring the bird up to temperature faster so it doesn't spend too much time doing the funky chicken before it finally cooks.
There's a couple of things that would help -- we could pour some water on the hot rocks to increase the humidity and minimize evaporative heat loss, or we could point a fan at the chicken to blow hot air against the chicken (the fancy-schmancy oven I mentioned above does both) -- but the easiest thing is to surround the chicken with something that has a higher specific heat, such as 140 degree hot water. To see how that works remember what happened in our thought experiment when the back of your thigh met the 140 degree cedar bench. Now imagine that the carpenter who built the bench left an exposed nail head -- let's make it a big twenty-penny nail, a full half-ounce of 140 degree, buttocks-searing iron -- and that you sat on it. The thermal tug-of-war where your thigh touches the nail head will go differently than before. That nail will have rather more heat energy available to try to bring your skin up towards its temperature. Even though the nail starts out at the same 140 degrees as the surrounding cedar it will feel hotter when you sit on it. You will notice it.
So if you have a sauna and you want to use it to cook chickens at the same time as you beat yourself with birch branches, the trick is to have a fifty-gallon steel drum filled with 140 degree hot water in the corner. Open the lid of the drum and drop in your chicken. Put the lid back on the drum so evaporation doesn't cool the water. While you are doing the traditional Finnish sauna thing -- shower, get in, sit and sweat, get out, shower again, get back in, flog yourself with the vihta... lather, rinse, repeat -- don't forget to open the lid occasionally and give the water a stir (so the water near the chicken stays hot). After about an hour of Scandinavian fun you chicken should be pasteurized and safe to eat. Voila! as the Fins say when speaking French.
Since I don't have a sauna, that plan was out. Also out was the eight-hundred dollar gadget at Williams-Sonoma, although I do admire it. It's a little too rich for my blood. Here's their video:
The three-hundred dollar Sous Vide Demi Supreme is also tempting but still more than I want to spend. Then there are several controller units that you plug your rice cooker or crock pot into to control the temperature (here and here). They cost about $150 if you shop around. Candidly, they probably represent the most sensible option but I am still too cheap.
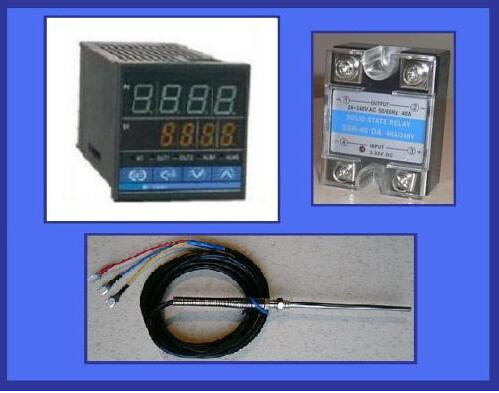
Which brings us to the do-it-yourself kits on eBay. Here's the one I bought:
The price was about fifty bucks but the vendor is in Canada and the shipping set me back another twenty-five.
Of course the kit only includes the key components. There are one or two more items you will need to put together a working device. Here's my kit along with the other items I bought to make it work:
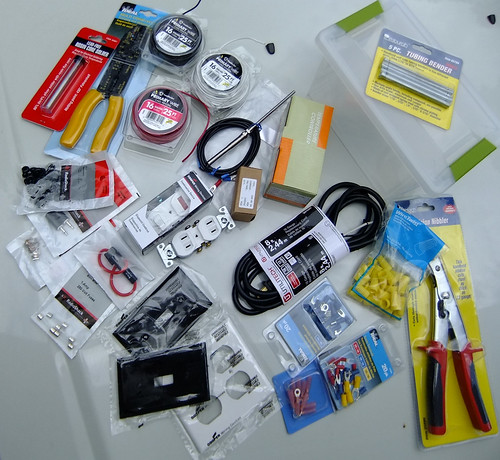
Many of the above objects are things that someone who frequently tinkers with electronics would have on hand, but I didn't. If you add the price of all the wires, jacks, fuse holders, grommets, twist connectors, etc. to the price of my kit you start to get awfully close to the price of the pre-assembled controller... but, if I had bought that I would have missed all the fun of making it myself. *sigh*
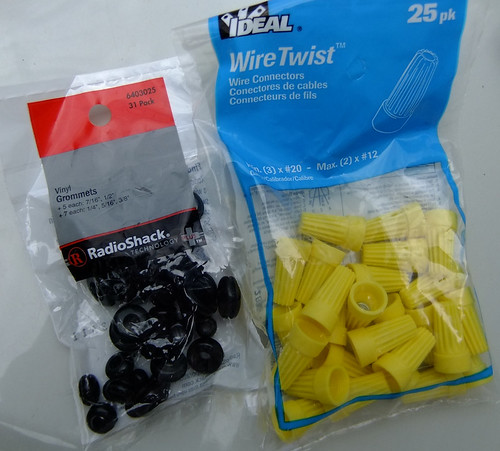
One thing that makes it hard to decide how much to claim I spent on the project is how to account for the stuff I had left over. Lots of items I needed came in large packs. I used one of the thirty-one grommets in the bag below and two of the twenty-five twist connectors.
I had planned to make the cutouts in my dollar-store plastic box by drilling a pilot hole and then shaping the hole with a nibbler. Unfortunately, the nibbler needs a fairly sizable pilot hole and the plastic box has a tendency to shatter when you try to drill it. I found it easier use a Dremel multi-purpose cutting bit both for drilling and for shaping the holes. It gives you a messy looking cut but I had face plates to cover the messy bits.
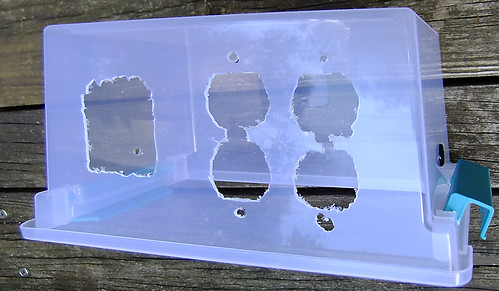
Here I am starting to fit in the switch and the plugs.
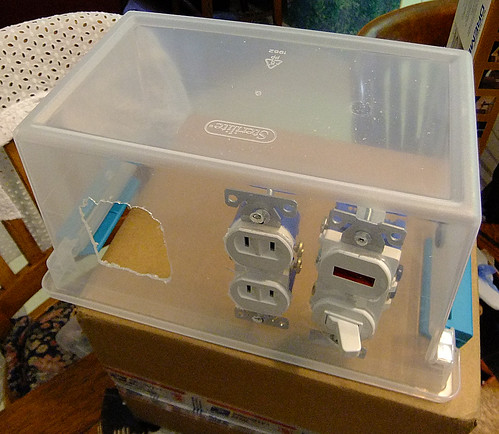
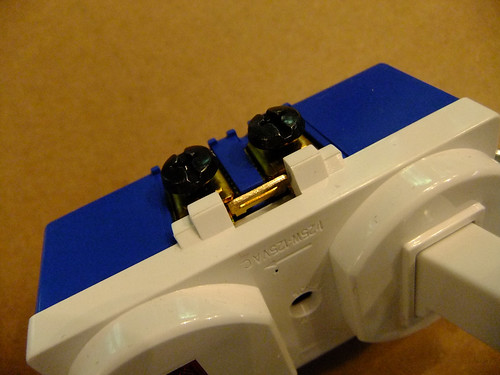
The outlet assembly has jumpers that join both socket's line connectors and both socket's common connectors so that both plugs can share a single line and a single common connection if desired. Here I am breaking the jumper off on the line side to separate the two outlets. I want one of them to be controlled by the temperature controller (so I can plug in my crock pot) and the other to be live whenever the switch is turned on (so I can plug in the aquarium air pump that drives the circulator.)
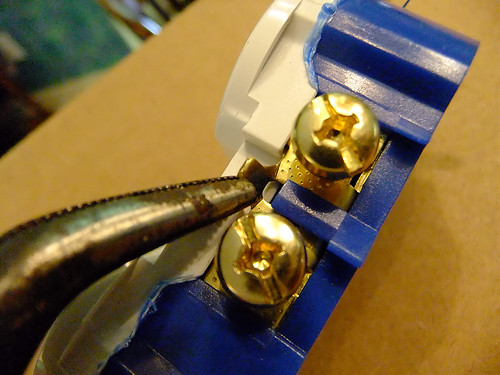
The line side of the switch/neon-lamp assembly also had a jumper that needed to be broken off.
Here is what the finished product looked like. The power cord comes in on your right through the rubber grommet. A few twists of electrical tape around the cord just inside the grommet provide strain relief. The line connection goes to the switch and is split three ways coming out of the switch. It goes to the circulator outlet, to the solid state relay and through the 1-amp fuse to the PID controller. The dc output of the PID controller goes to the input side of the SSR which causes it to drive both the crock-pot outlet and the neon lamp when it is turned on. The common (ground) return wiring completes the AC wiring which is generally to the right of the PID controller. One the left (yellow wires) is the wiring for the temperature sensor jacks. I tried to keep the AC and the sensor wiring separated to avoid crosstalk that might corrupt the temperature reading.
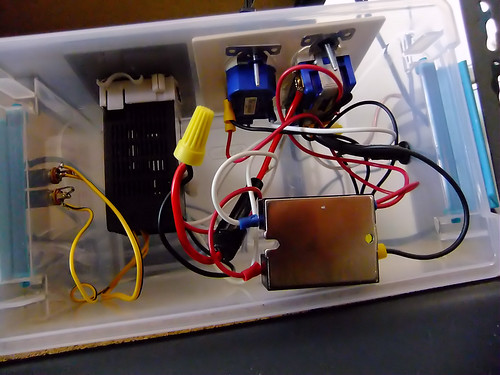
Since the photo of my wiring is not particularly helpful and since my description in the preceding paragraph is probably indecipherable, I have drawn a schematic. The PID controller came with a manual (of sorts.) I can't be sure but, from the way it reads the manual was translated to English from its original Klingon by drunken elves.
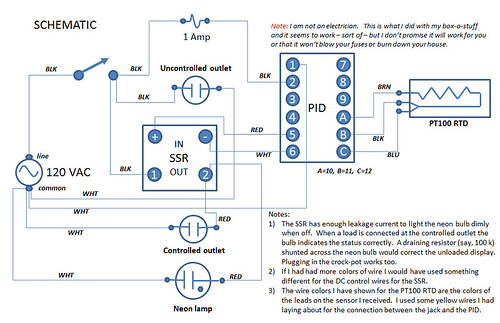
One of the parts of the manual that can be made out is a schematic somewhat similar to the above. A few parts are mislabeled in the schematic in the manual and, oddly, it shows the SSR between the heating element and ground. This seemed less safe to me since it would mean the crock-pot connection would have line voltage present even when the relay was off. In my device (and in my schematic) the SSR controls the application of line voltage to the heating device and the ground is always connected.
When I finished the wiring, checked my connections, plugged the device in and turned it on there were two problems that slowed me down. First, the wire I used to connect the PID controller to the jacks for the temperature sensor were stranded and when I soldered the connection to the jack plugs a stray strand caused a short circuit. This caused the temperature to read -199.9 degrees Centigrade at all times. I found the short and fixed it which corrected the temperature reading. The other problem was that the neon indicator light -- which was supposed to show that the crock-pot heater was turned on -- was lit up all the time. After hours of research I decided that the SSR had enough leakage current when it was in the "off" state to light the neon bulb. I could add a bleeder resistor in parallel with the lamp to fix the problem -- or I could let the crock-pot heater serve as the bleeder resistor and remember that the neon lamp only indicates correctly when the crock pot is plugged in and turned on.
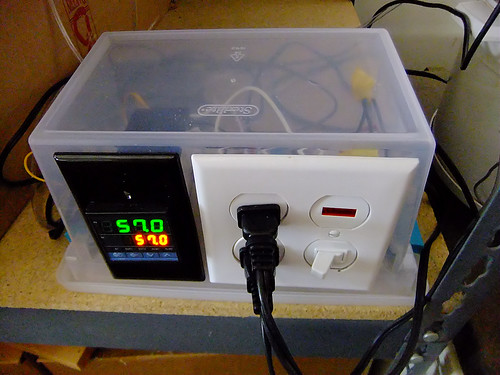
Here is the device holding the crock pot at 57 degrees Centigrade (about 134 Fahrenheit). The PID controller has a self-configuration process where it measures the parameters of the device it controls and sets itself accordingly. It took about half an hour, during which time the temperature of the water went up and down by several degrees. The automatic configuration process seems to have worked well. The device holds the temperature of the crock pot within 0.1 degree Centigrade and seems quite stable.
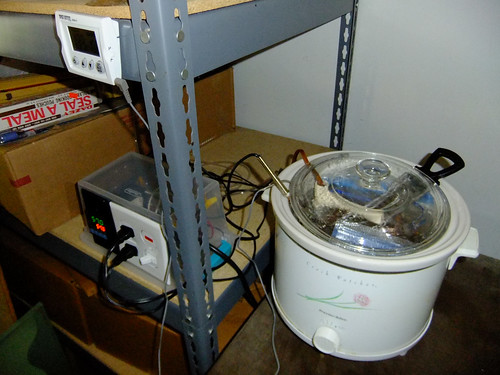
Here is the whole setup operating in its place of honor on top of the chest freezer in the garage. It is holding a chuckeye roast at 57 C for 30 hours. I divided the roast into two pieces and sealed the pieces with sprigs of rosemary in ZipLock vacuum freezer bags. The ZipLock bags work quite well; you pump the air out with a cheap, washable plastic hand pump; the bags hold their vacuum well and are designed to go in the microwave so they resist temperatures up to, and slightly above, the boiling point of water.
If you look closely at the photo above you will see that the lid on the crock pot doesn't quite fit. It is the lid from our other (smaller) crock pot. There is a funny story about that but first, instructions for how to drill a hole in the lid of your crock pot for the temperature probe.
Please read these instructions to the end before starting. Be sure to wear safety glasses.
The best way to drill holes in glass is to use a diamond-dust-coated drill bit but you can use a less-expensive carbide bit to do one or two holes (after which it will be dulled). To drill a crock pot lid you select the location for the hole and place the lid upside down on a work surface you don't mind drilling into. Arrange the lid so the location to be drilled is the lowest point and pour half an inch of water into the lid. The water is to lubricate the drill and keep drill and glass from overheating. Work slowly. Don't force the bit; just keep a steady light pressure and stop occasionally to let any heat dissipate. You will notice that the water starts to get milky. This is from fine particles of glass suspended in the water. By this method you can drill a hole about half way through the tempered-glass lid of your crock pot. Then it will explode. Tell your wife you dropped it. Later you can confess in your blog.
The problem I had hoped to solve with the hole in the lid is the positioning of the temperature probe. The probe is stainless steel, about four inches long and nicely waterproof. I don't want to get the cord in the water since a leak at the place where the cord joins the probe might throw off the temperature reading. If you lay the probe on the rim of the crock pot and lay the lid on top it sits at too shallow an angle and barely touches the surface of the water. If you stick it in farther then the cord gets wet. Googling for other people who have made similar apparatus I found found crock pots that have screw-on handles that can be removed and the mounting hole used for the temperature probe. I am still working on the temperature probe / lid problem.
Here is a closeup of the crock pot it the lid off to show its contents. Inside are the two pieces of chuckeye roast and a circulator made from (hot-water-rated) CPVC pipes and joints, copper tubing and an aquarium air pump. Around the rim, clockwise starting at 9:00 are: the temperature probe for the PID controller; the temperature probe for my meat thermometer; the copper pipe that feeds the circulator and my frying/candy thermometer.
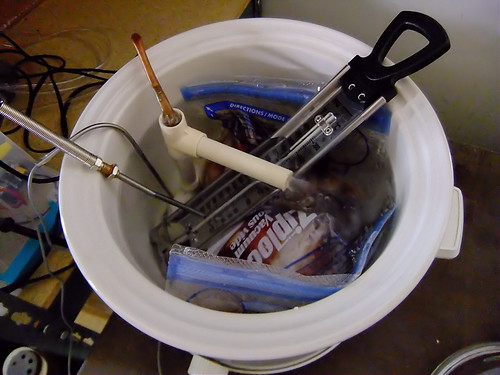
The circulator uses an air-lift to pump water; the bubbles rising in the vertical CPVC pipe lift water from the bottom of the crock and the water flows out the horizontal tube. The warm air flows out the top of the vertical tube and exits the crock through the gap between the crock and the lid (where are the pipes and wires and probes hold it up.) The circulator works fairly well (you can see the stream of water flowing out) but is a bit noisy and quite a bit of water is lost through evaporation. In a bit over 30 hours of operation I needed to top off the water five times. As well as cooking your food the rig makes a pretty good humidifier. As such it may be able to come in from the garage during the winter when warm, humidified air is more welcome than it is at the height of the warmest summer in NC since 1952.

Here is the reading on my meat thermometer. 57 degrees Centigrade is 134.6 Fahrenheit so we are a degree and a half off. That's may have something to do with the lid being removed (it had been reading 134 with the lid on) but is good enough anyway. The reason I have three thermometers going is that when you are using sous vide techniques to slow-cook rare meat at low temperatures you are only about ten degrees away from safety problems. Obviously with a newly homemade device I want a bit of confirmation that the temperature is right. It seemed OK. Next time I will omit the frying thermometer but the meat thermometer is probably a permanent fixture because of the added safety factor and because my PID controller only does Centigrade and it is handy to have the meat thermometer to remind me what temperature 57 C is in temperatures I can understand.
Results
ChuckEye:
When it was time to serve the chuck steaks I took the meat out of the bags and sliced each of the pieces in half (giving me four steaks, each about 1 1/2" thick). The (rare but thoroughly cooked) steaks went on a hot grill for a very quick sear and were served. They were quite tasty -- really good, actually, for such an inexpensive cut of beef -- but I think I over-salted them in the bag; they had a bit of a cured beef taste and texture (a bit like corned beef) and had lost quite a bit of liquid in the bag. But they were very tasty and I saved the beef tea from the bag to make onion soup the next day.
BBQ Chicken:
I did boneless thighs and deboned breasts. The thighs went in the sous vide first for two hours at 160 degrees (to soften the connecting tissue so they wouldn't be chewy) and then I dropped the temp to 140 and added the more-temperature-sensitive white meat for another hour and a half. When they came out I covered them with a smoky-sweet BBQ sauce and threw them on a very hot charcoal grill for just a bit of caramelization. It was very tasty but next time I may leave the ribs on the breasts to protect them from the heat on the grill while I am giving them the quick char.
Duplicating the Caterer's Chicken from the Reception:
Haven't attempted a whole chicken yet. I think I know how to proceed but they had a sale on rotisserie chickens last week at the store where we shop and we are a bit tired of roasted chicken right now. I'll keep you posted.
In General:
The electronics seem to work flawlessly; the temperature control is very good -- quite stable and recovers quickly without too much overshoot -- but the crock pot lid / temperature probe positioning issue is still a work in progress. Nor have I perfected my sous vide recipes quite yet. But I remain hopeful and will let you know.
Links:
My photoset on Flickr for this project contains a few more photos of the process with notes that may expand on the information provided here.


Mad Science, a set on Flickr.
A vastly swell web page written by the guy who did the sous vide cookbook that everyone seems to talk about. http://www.douglasbaldwin.com/sous-vide.html#Equipment
A guy who built a sous vide cooker using the same stuff from eBay. http://mythopoeic.org/sous-vide-cooking/
Another DIY page: http://www.instructables.com/id/Sous-Vide-temperature-controller-for-50-100/
Seems to be the manual for the PID controller (or one like it): http://www.sure-electronics.net/measure,tools/TE-MT007_Ver1.0_EN.pdf
... or maybe... http://tinymicros.com/mediawiki/images/a/a4/CB100_Dual_Digital_PID_Temperature_Controller.pdf
A two part series on Sous Vide from the French Culinary Institute: part 1 and part 2
Science's finest hour! http://www.seriouseats.com/2010/03/how-to-sous-vide-steak.html
Info on cooking chicken sous vide http://www.cookingsousvide.com/info/sous-vide-guides/more/sous-vide-chicken-guide
UDSA guideline tables to pasteurize been, chicken and Turkey: http://www.fsis.usda.gov/OPPDE/rdad/FSISNotices/RTE_Poultry_Tables.pdf
Note: These are the required holding times after the internal temp has been reached.
Not actually sous vide related but endlessly interesting: http://khymos.org/hydrocolloid-recipe-collection-v2.2-screen-res.pdf (found link here: http://www.saltyseattle.com/2010/09/potato-artichoke-bisque-sous-vide-with-carrot-caviar-spheres/ )
http://www.edinformatics.com/math_science/science_of_cooking/chicken_sous_vide.htm
Update: Diagram of my circulator

A commenter asked for a photo of my circulator. I don't have a good one so I drew the above diagram to give him/her ... OK, him since I can't imagine a female type asking that particular question ... where was I? Oh yes, to give him an idea how it works. The device consists of six short pieces of hot-water-rated PVC pipe, two tees, two elbows and about ten inches of small-guage copper tubing. An aquarium pump provides air through the copper tubing to lift water from the bottom of the crock pot to the top where it flows out the upper pipe while most of the air continues up and out the top. It works fairly well. All of the parts that are actually in the crock pot are rated for use with potable hot water. Nothing is glued -- I just put it together like tinker-toys each time I use it and pull it apart when I am done.
The main problem with it is that it pumps air into the crock pot which has to go somewhere so there is a constant flow of hot moist air out of the lid which condenses on nearby surfaces. In addition to making things damp this water needs to be replaced. While I am running the rig I need to add two ounces of water per hour to replace evaporation and keep the level constant.
Other people use fountain pumps but I am not sure I like them with hot water and cooking appliances. I would love to find a better circulator -- something that would do as good a job of circulating the water without requiring the air pump.