I'm going to be writing about the stereo (3D) camera I made with a total expenditure of about 70 bucks but, before I start I want to teach you a trick for cheating on the "Find the Ten Differences in these Pictures" feature in the Sunday Comics page of your newspaper. I want to do this first because the way the newspaper business is going the Sunday Comics may be gone before you can read this posting to the end.
The trick is this: you hold the paper so the two versions of the picture are side by side and cross your eyes so you are looking at one version of the picture with your left eye and the other version with your right eye. Just relax your eyes and let them cross so you see three copies of the picture and concentrate on the one in the middle. If the pictures are over/under you will need to turn the newspaper sideways. Assuming you have adequate vision in both eyes you can almost always do this with a bit of practice. Your brain will fuse the two pictures into one image that appears to float a few inches in front of your nose. The parts of the pictures that are the same will look normal but the parts the are different will appear to shimmer or flicker. That missing button on the clown or the dog's tongue out vs. in will be dead easy to spot.
I don't have any of those find-the-differences pictures laying around for you to try out (they are copyrighted and I am too lazy to draw one) but here is something I whipped up in PowerPoint. Look at it and relax your eyes. Let them cross slightly so you see three boxes, not two, and then concentrate on the box in the middle. The parts that are different will appear to shimmer or flicker. Try it and you'll see what I mean. Let your mouse cursor hover over the image for the answers.

Here's a slightly harder one, again a PowerPoint image. This time the only difference is the spacing between the letters. Some of the text is slightly to the left or right depending on the image you are looking at. What you should see is some of the letters appearing closer to you than the rest. Your eyes have to cross just a bit more to see those letters and your brain will interpret that as their being closer.

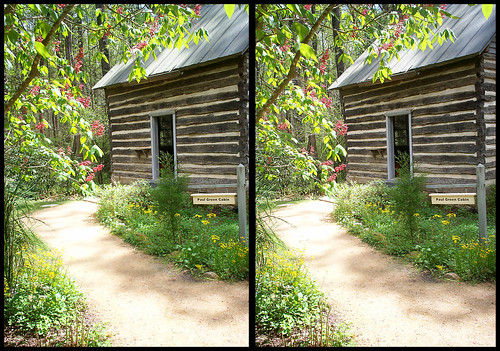
By a happy coincidence the technique for looking at crosseye-format stereo images is the same as we've been doing here. Here are two images I took at the NC Botanical Gardens in Chapel Hill last weekend. The photos were taken at the same time by cameras about four inches apart. Again your brain will interpret parts of the picture that are farther apart (so you cross your eyes more to look at them) as being closer. In these photos the bottle trees are farther apart (and thus appear closer) than the bench.
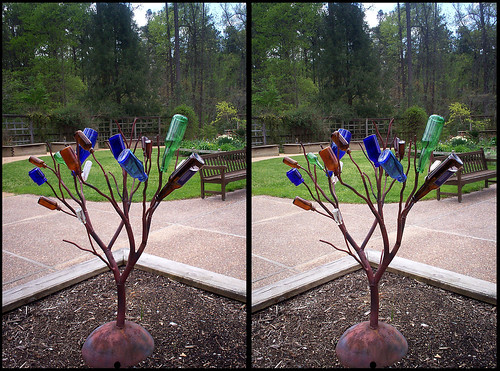 Click on the image to see it larger. It might help to slide your chair back and view it from a bit farther away.
In my description of the photo above I mentioned that the photos were taken
at the same time. That's the hard part. If you are going to take 3D photos of anything that moves (ie. people) you need both images to be taken at the same time. One way to do this is to use a single camera with a beam splitter -- a collection of prisms and mirrors you put in front of your lens to split the image -- which gives you perfect synchronization but so-so images (because of all those mirrors and prisms and such.) See my posting on my
Russian made SKF-1 beam splitter for more info. The other way is the use two cameras and try to figure out a way to make them do the same thing at the same time. That's what I have been trying to do lately.
I should probably mention at this point that I have not been altogether successful in that regard. I am still struggling with a few technical bits and if you are looking for complete instructions for making a reliably-synchronized stereo rig you can stop reading now, and if you are an optimist you can check back in a few weeks to see if I have the problem solved.
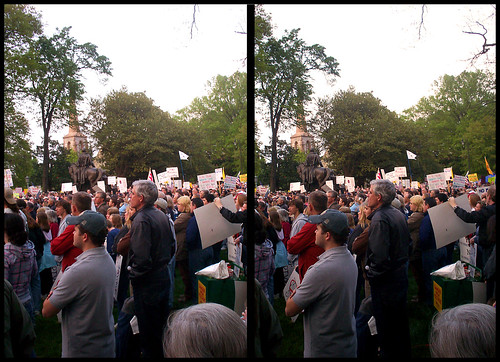
Here is a photo that shows the problems you run into if your stereo images are not properly synchronized. In this photo the two cameras went off a fraction of a second apart-- just enough time for a few things to have moved. The image on our right was taken first then the one on the left. When you view this as a 3D crosseye image the things that have moved will shimmer and flicker like the differences when we were cheating on the find-the-differences puzzle.
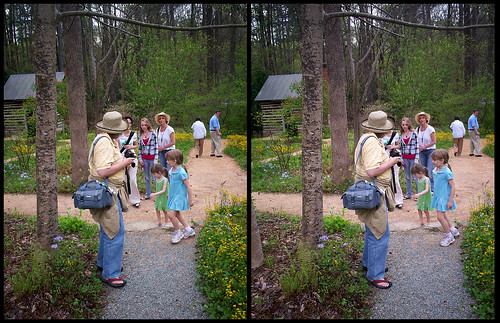 Click on the image to see it larger. It might help to slide your chair back and view it from a bit farther away.
So what has moved? The most obvious thing is the legs of the girl in the blue dress. She is walking across the frame right to left and, for the most part the displacement simply makes her look a bit closer than she actually is, but her moving leg and her swinging arm are too different and our brains can't fuse them into a consistent image -- so they shimmer. The young lady in the green dress was turning and the hem of her dress looks a bit odd. The lady in the background (white shirt) was putting her foot down and her left leg shimmers. And finally, the lady in the foreground -- the one who looks a bit like the Queen dressed up as Paddington Bear, and who says she was not dressed for a photo shoot and has expressly forbidden me to post any pictures of her in that outfit -- has moved her toes.
<tedious reading="optional">
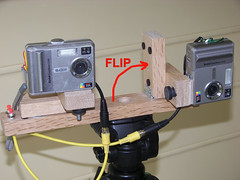
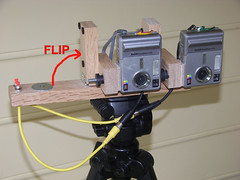
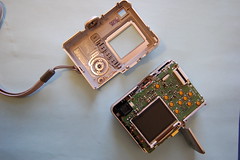
Here is a photo of the stereo rig I built.
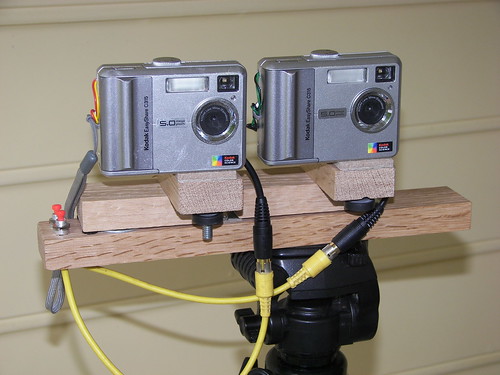
Lots of people have built stereo rigs, most of them better built than mine, but I don't remember seeing one before that converts from horizontal to vertical format.
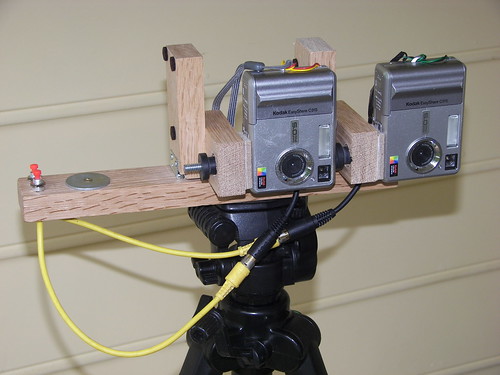
It is constructed from two Kodak C530 digital cameras that I have modified to accept an external shutter button.
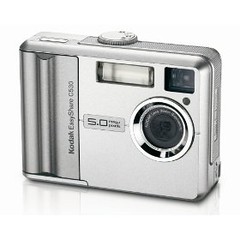
I chose the C530 for a number of reasons: First, it can be had cheaply -- a used one in good shape can be had for twenty bucks on eBay; Second, it is fixed-focus which should make the shutter delay more predictable; Third, it is small enough to sit side-by-side without making the lenses too far apart; Forth, it is large enough for a clumsy tinkerer to solder bits of wire into its innards and still put the case back together; and Fifth, it can be had cheaply.
Because the C530 is fixed focus there is no fancy three-way button that you push half-way to lock the focus. My plan was to make the additional connections to two C530s to allow them to be hooked up to external shutter connections. I had hoped to hook both cameras in parallel to a single switch. I haven't got that part to work yet but more on that later.
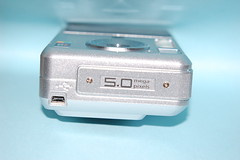
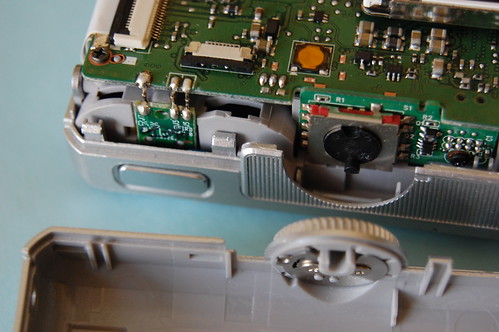
To open the C530 you take out six small screws -- two on each end and two on the bottom, make sure the selector wheel is set to the "OFF" position, open the battery compartment and pry the case apart at the midline.
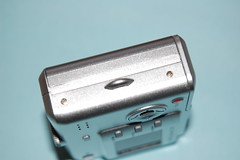
This photo shows the shutter button circuit board, the control wheel and illustrates why the case won't open if the wheel is not in the OFF position.
Here is a detail of the shutter button circuit board.
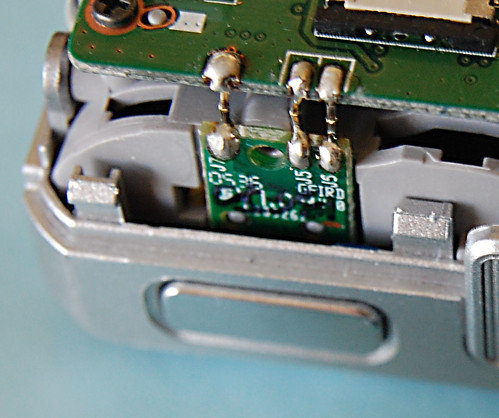
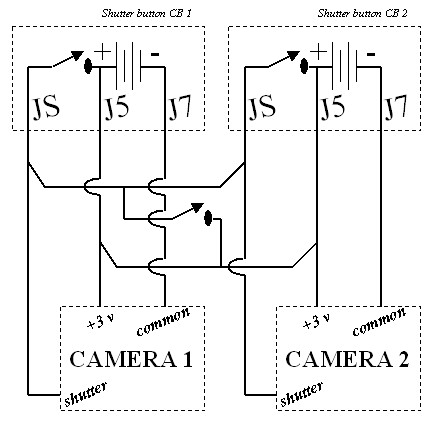
The circuit board sits on top of the battery compartment and appears to provide power to the camera through jumpers J7 (battery common) and J5 ( +3 vdc ). It also provides +3v to JS (shutter?) when the button is pushed. Here's my guess for a schematic.
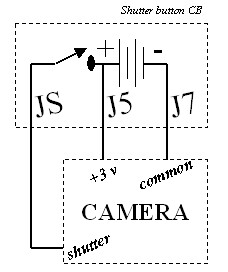
Since the shutter switch is between J5 and JS that is where my external switch connections ought to go too, so I soldered on a couple of bits of wire, routing them beneath the other connections and towards the end of the camera.
 No, I'm not proud of those solder joints but there are good connections with no shorts.
It's a bit hard to see here but I have enlarged the screw hole enough for the wires to pass through it and used a pair of diagonal cutters to clip off the tab that the screw previously connected to. This allows me to close the case and route the wires out the old screw hole.
Once I had the wires connected to the shutter switches on both camera I closed the cases, put in some batteries and made sure I could fire the shutters by shorting the wires. So far, so good.
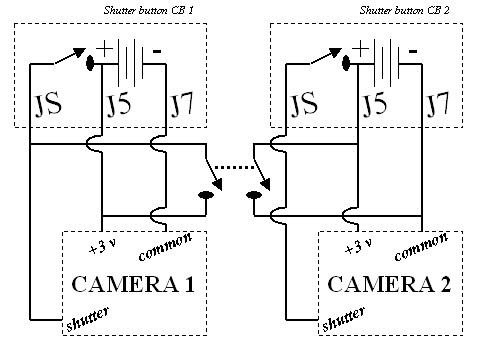
In theory I thought I could just hook both cameras together in parallel J5 to J5 and JS to JS and fire both cameras together with a switch between the J5 and JS connectors. The schematic would look something like this.
 But that doesn't work.
 For some reason the cameras don't like to be hooked together. Once they are connected J5 to J5 and JS to JS and turned on they take turns going off a random until they are turned off, disconnected or run out of memory.
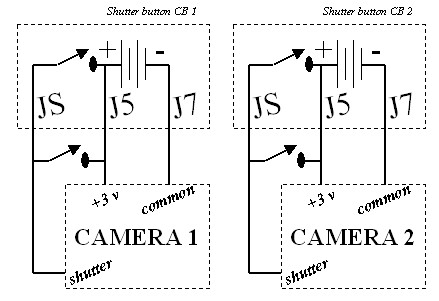
My new plan was to use a double-pole single throw momentary contact pushbutton switch -- one that is really two switches (for two separate circuits) that are both activated by the same button. The schematic for that would look like this:
 But the problem is...
 DPST pushbutton switches are hard to find. Radio Shack failed me so I turned to the Internet. Not much help there either, as it turns out. I'll find one eventually. But for now, I have installed two buttons side-by-side -- close enough to press both of them with one finger.

My first session with the new rig was both encouraging and a failure at the same time. It was encouraging in that I got some very nice stereo images and the synchronization was occasionally fine -- indicating that the two cameras do have a very similar shutter-lag -- but discouraging in that I had trouble pushing both buttons at the same time and got quite a few photos like the one above with the little girl in the blue dress.
So, I have redoubled my efforts to find that DPST pushbutton and have ordered this button...
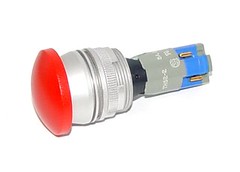
... which claims to have the electricla properties I am after and offers the additional advantage of being very, very big, red and silly-looking. I'll post the results of the installation of the Big Red Emergency button when it comes.
</tedious>
Since I wrote the above I have taken the rig on another outing --
the Tea Party demonstration at the NC State Capitol and I continue to struggle with synchronization. In fact, it is difficult to get one of the cameras to fire at all sometimes. I think one of the buttons may be defective or have a loose connection. You have to push it just right to fire the camera. Maddeningly, it seems to fail most often when you are holding the rig overhead for a crowd shot like this one:

But it does work -- more or less -- and when it does work you can capture quite a nice image with it.